Articles by "moviemaker"

06:13 ,
In this tutorial you will learn how to Add/insert Transitions and visual effects in windows live movie maker to make your movies look more awesome.

Tutorials On Windows Movie Maker

  1) Add Videos Photos & Music            2) Add Titles Captions & Credits

  3)  How To Add/Remove Transitions & Visual Effects          4) How To Trim & Split Audio Files

   5) How To Trim & Split Video Files        6) Time Lapse Video (Fast & Slow Motion)

  7) Remove Sound From Video            8) Convert Video To Audio

 9)  Insert Text Logo/Watermark            10) How To Add Censor Beep Sound

11)  Create Automovie           12) Top 10 Free Intros For Windows Live Movie Maker


Just follow my tutorials and you will learn how to use this simple software. If you want to know How add transitions in videos? How to apply visual effects? How to remove transition or visual effects? Read below

How to add remove transitions and visual effects in windows live movie maker

Adding Transitions-

       One thing to remember transitions appear at the beginning of the clip so if you want to add transitions in the middle of the video every time you will need to split the clip where you want that transition to appear.

Different styles of transitions available
How to add transitions

 Put the cursor where you want the transition then click on animations tab just hover over any transition style and you will immediately see the effect in preview windows once you satisfy with the transition style click on it to apply the clip. If you want same transition for all the clips you can click on apply to all option.


Adding Visual Effects -

        Just like transitions to add different visual effects to clips you will need to split it. But visual effects remain on entire length of the clip like transition they don't disappear in seconds.
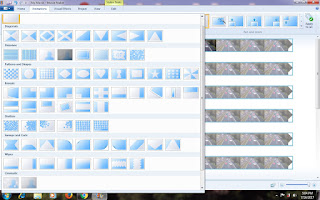
Different visual effects available 

How to add visual effects

To make visual effects put your cursor where you want to add visual effects click on visual effects tab there are lots of visual effects styles available hover over each of those and see it's preview in preview window once you satisfy with the style click on it to apply same visual effects to entire video click on apply to all option.


Remove Transitions/ Remove Visual Effects

       To remove transitions from project put your cursor where you have applied transition then click on animations tab click on very first style of transitions which is no transition. It will remove applied transition.
        To remove visual effects from project put your cursor where you have applied visual effects then click on visual effects tab click on very first style of visual effects  which is no effect. It will remove applied visual effects.

Check my video tutorial here

How To Split Trim/Crop Audio In Windows Live Movie Maker

In this tutorial you will learn music/audio editing where you will learn how to split audio clips how to trim/crop audio clip and bonus how to delete audio clip in windows live movie maker.

Tutorials On Windows Movie Maker

  1) Add Videos Photos & Music            2) Add Titles Captions & Credits

  3)  How To Add/Remove Transitions & Visual Effects          4) How To Trim & Split Audio Files

   5) How To Trim & Split Video Files        6) Time Lapse Video (Fast & Slow Motion)

  7) Remove Sound From Video            8) Convert Video To Audio

 9)  Insert Text Logo/Watermark            10) How To Add Censor Beep Sound

11)  Create Automovie           12) Top 10 Free Intros For Windows Live Movie Maker


Just follow my tutorials and you will learn how to use this simple software. If you want to know How to split video in two clips? or How to trim/crop audio to specific length? Read below


Split Audio
 
First double click on audio/music track so it will open options tab to edit audio. Then put cursor where you want to split the audio/music and on options tab click on split.

If you want to delete the remaining audio/music clip click on remaining clip and hit delete key on keyboard to delete the selected audio clip.

Bring track to original length
 
If you want you can bring track to it's original length just options tab adjust the set end point time.

Trim/Crop Audio

To trim /crop audio set the starting point and end point it will trim/crop your audio clip.
Any time you can set ti to it's original time by setting starting point to 0.00s.

Delete part of audio
 
Split the audio clip to set starting point to delete the audio/music clip take cursor where you want to split the audio and again click on split. Click on splited audio part and hit delete key on keyboard. It will delete the part of audio.

Watch video tutorial here

00:53 1 , ,

Windows Live Movie Maker

     Windows live movie maker is a free software available on windows platform. You can use it to create awesome movies with it. It's really simple to use just drag and drop sort of application. Not complex like other premium video editors, so anybody can use it and master this tool. 


Tutorials On Windows Movie Maker

  1) Add Videos Photos & Music            2) Add Titles Captions & Credits

  3)  How To Add/Remove Transitions & Visual Effects          4) How To Trim & Split Audio Files

   5) How To Trim & Split Video Files        6) Time Lapse Video (Fast & Slow Motion)

  7) Remove Sound From Video            8) Convert Video To Audio

 9)  Insert Text Logo/Watermark            10) How To Add Censor Beep Sound

11)  Create Automovie           12) Top 10 Free Intros For Windows Live Movie Maker

      Just follow my tutorials and you will learn how to use this simple software. If you want to know How to add title in windows live movie maker? How to add subtitles or captions in windows live movie maker? How to make end scrolling credits ? Read below

How To Add Titles,Captions And Credits In Windows Live Movie Maker


2) Adding Titles, Captions & Credits 

In previous part we saw how to import (add) videos/photos and music to our work area. Now in this second part we will see how to add titles, captions and credits to it.

  • Adding Titles

     Just like any movie we watch in theater it got titles at the beginning of the movie just like that we can add titles at the beginning of our movie too. Not only at the beginning but you can add titles at the middle of your movie so you can create different sections in the movie and create titles for each of them.

    So let's see how to add title in the beginning. Click on home tab if it's already not selected click on Title. If you want title to appear in middle of the movie for that first you will need to split the clip as I said title appear at the beginning of the clip so put your cursor where you want the title right click on it from popup menu click on split option. And then click on title.

    Double click on title in work area or in preview pane. And edit the text. To give your title background color, Click on format tab if it's not selected click on background color click on the color you want .
    Just like that you can give text color to your title click on title, click on text color click on any color you want. To change font click on font family option click on font, to change font size click on font size and select the size. Click on bold or italic option if you want text to appear bold or italic. To give little animation type of look to your title click on format tab if it's not selected click on any effect style from effect option.
  • Adding Captions

     Adding captions to the movie is so simple and interesting with windows live movie maker. Not only you can add the captions but you can decide where it should appear, how much space it can take and how the way should it appear in movie via choosing suitable effect. Background color option is not available for captions.

    So let's see how to add captions in our project. Play the video in preview pane and pause it where you want the caption to appear. Click on home tab if it's not already selected then click on captions button. Edit the text. To give it a text color, font, and change it's size make it bold or italic follow the steps I mentioned how to change the title.

    You can drag and drop your caption anywhere in movie just click on it a rectangle border will appear with round handle just hold your left mouse button and drag the caption in preview pane anywhere you want it. To change it's size you can drag it's border to the length of the text.

    While it's selected click on format tab click on any effects available in effects. So your captions will get little animation.


  • Adding Credits 

     Just like any movie we can add credits to our project. There are different credits options available for that in windows live movie maker. Like you can add director, starring, location and soundtrack credits as well as you can add your own credits via blank credits option.

    So let's see how to do that click on home tab click on credits(add credits) option it will appear at the end of our project at the end point of last clip in project. Double click in preview pane to edit the text of credits here you can say thanks for watching movie or you can add credits to other sites references you used in your project or any person name who have help you in making this movie.

    As I said you can add director, starring, location, soundtrack credits for that click on credits little down arrow from sub menu click on choose the option you want and edit it.

    Just like title or caption you can change it's text color, font, font size make it bold or italic clicking on format tab. To give it effect click on any effect style in effect option.

    Follow my video tutorial for more clear understanding


00:03 , ,

Windows Live Movie Maker

         Windows live movie maker is a free software available on windows platform. You can use it to create awesome movies with it. It's really simple to use just drag and drop sort of application. Not complex like other premium video editors, so anybody can use it and master this tool. 
 

Tutorials On Windows Movie Maker

  1) Add Videos Photos & Music            2) Add Titles Captions & Credits

  3)  How To Add/Remove Transitions & Visual Effects          4) How To Trim & Split Audio Files

   5) How To Trim & Split Video Files        6) Time Lapse Video (Fast & Slow Motion)

  7) Remove Sound From Video            8) Convert Video To Audio

 9)  Insert Text Logo/Watermark            10) How To Add Censor Beep Sound

11)  Create Automovie           12) Top 10 Free Intros For Windows Live Movie Maker


  Just follow my tutorials and you will learn how to use this simple software. If You want to know, How to add videos in windows live movie maker? How to add photos in windows live movie maker? or How to import music in windows live movie maker. Read below.

How To Add Videos,Photos And Music In Windows Live Movie Maker

1) Adding Videos,Pictures & Music

       So let's start, in very first part we will see how to import videos,pictures and music into work area.
  • Adding Videos

    To add videos to windows live movie maker project click on home tab if it's already not selected.
    Click on add videos and photos or you can click on click here to browse for videos and photos option in work area.

    From Add Videos and Photos dialogue box select the folder where you have kept your video clip which you want to edit select it and click open button.
  • Adding Pictures

    To add pictures to your project first put the cursor where you want the picture to appear if you want it in the middle of clip first you will need to split the clip. For that put the cursor where you want to split the clip and right click it from pop up menu click on split option.
    Then click on add videos and photos option from dialogue box select the folder where you have kept the pictures select one or if you want to select more than one picture hold on ctrl key on keyboard and click on pictures then click the open button.
  • Adding Music 

    To add music track to your entire project click on home tab click on Add music option under add music from pc click on add music go to the folder where you have kept the music select it and click open button.

    If you want music to appear from specific point put your cursor at that position and click on add music under add music from pc click on add music at the current point option select the music track you want and click on open button.


    Follow my video tutorial for more clear understanding


    Isn't it so simple :)

    In next tutorial you will learn how to add Titles, Captions & Credits in our windows live movie maker project.


MKRdezign

Contact Form

Name

Email *

Message *

Powered by Blogger.
Javascript DisablePlease Enable Javascript To See All Widget